
Introduction
Web based REST/JSON API for Polimex control panels and convertors
iCON 50/110/115/130/180/SmartVend/Turnstile/Elevator/Relay
Brief description
This document describes the concept of the Polimex Web Software Development Kit. You need this information if you are going to design your own software. For any details or misunderstandings you can always contact us. The support for this SDK is free of charge. The SDK describes the way of communication between Computer and Polimex Equipment with Web SDK Functions (All Ethernet based product manufactured after August 2013).
Concept
This SDK gives you an option to communicate with our equipment freely and fully functional without any restriction. The main goal of web based communication is to make the communication with access control panels more easy. The Callback function gives the possibility to establish communication with Ethernet devices behind Firewalls and NAT. In this case, you can make any type of cloud based services for your customers. This network installation is more than easy, just plug the unit in your customer’s network (DHCP suggested) with Internet.
Need to know before continue: JSON, HTTP, HTTP Methods, Basic HTTP access authentication.
The use cases can be as figure below:
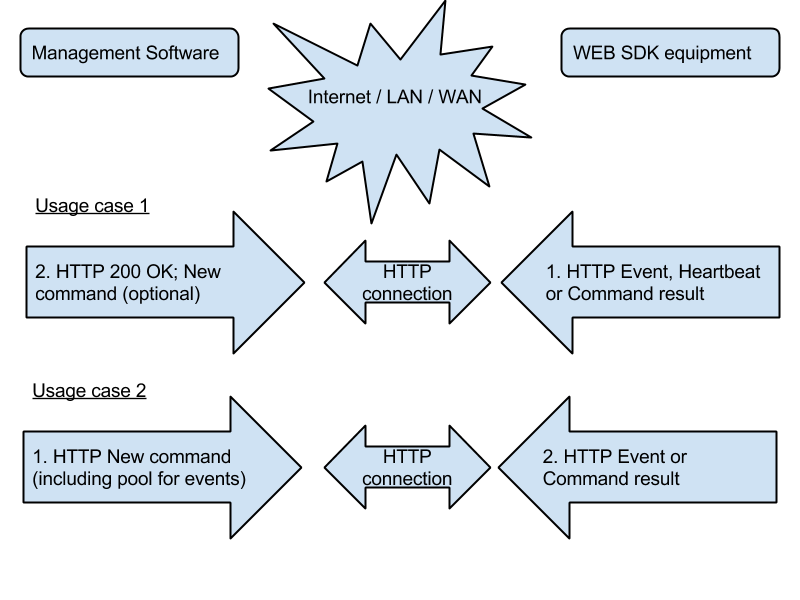 Both case scenarios can be use in same time.
From computer side you can work as HTTP Server and/or HTTP Client
The communication is divided in 2 sections: 1. Sending commands to equipment (act as HTTP Client)- two options: Direct command with HTTP request Command in Event Answer 2. Receiving events from equipment (act as HTTP Server)
Commands to module
HTTP Client
Get version from module
{
    "convertor": 240835,
    "sdk": {
        "sdkVersion": 1.3204,
        "sdkHardware": 10.3,
        "TCPStackVersion": "5.42.04",
        "ConnectionType": 1,
        "cpuUsage": 0,
        "isDeviceScan": 0,
        "isEventScan": 1,
        "isEventPause": 0,
        "isCmdWaiting": 1,
        "isCmdExecute": 0,
        "isBrigdeActive": 0,
        "isServerToSendDown": 0,
        "maxDevInList": 8,
        "devFound": 2,
        "scanIDfrom": 0,
        "scanIDto": 255,
        "scanIDprogress": 0,
        "heartBeatCounter": 0,
        "heartBeatTimeOut": 0,
        "upTime": "5d 12:05:15",
        "remoteIP": "0.0.0.0"
    }
}
GET http://websdk.polimex.online/sdk/details.json
| JSON field | Description |
|---|---|
| sdkVersion: 1.3204 | Version of the WebSDK |
| sdkHardware: 10.3 | Hardware version of the module |
| TCPStackVersion: “5.42.04” | Internal information |
| ConnectionType: 1 | Connection type 1 = Ethernet |
| cpuUsage: 0 | Current CPU usage |
| isDeviceScan: 0 | Is in scanning proccess (0/1) |
| isEventScan: 1 | Is the event scan running |
| isEventPause: 0 | Is the event scan in pause |
| isCmdWaiting: 1 | Internal information |
| isCmdExecute: 0 | Internal information |
| isBrigdeActive: 0 | Is Bridge connection active – if active the WebSdk not working |
| isServerToSendDown: 0 | Information for your server |
| maxDevInList: 8 | Max supported controllers from module |
| devFound: 2 | Controllers found after this module |
| scanIDfrom: 0 | Start scan from ID |
| scanIDto: 255 | End scan to ID |
| scanIDprogress: 0 | Scan in progress |
| heartBeatCounter: 0 | Heart beat count |
| heartBeatTimeOut: 0 | Heart beat timeout |
| upTime: “5d 12:05:15” | Uptime of the module |
| remoteIP: “0.0.0.0” | Last IP address connected to Bridge |
Start scan for controllers
HTTP Request
GET http://websdk.polimex.online/sdk/cmd.json?scan
Query Parameters
If no other parameters, the scan starts from 0 to 254 Optional parameters are
| Name | Description |
|---|---|
| scan=1 | Start the scan procces – equal to no parameters |
| from | Start ID for scan – default 0 |
| to | End ID for scan – default 254 |
Example:
GET http://websdk.polimex.online/sdk/cmd.json?scan=1&from=0&to=25
This example start the scanning proccess from 0 to 25 only
Get status and version of the detected controllers
{
    "convertor": 240835,
    "dev": {
        "devInList": 0,
        "devID": 1,
        "devHardware": 9,
        "devSoftware": 734,
        "devSerial": 6,
        "devError": 0,
        "devInputs": 0,
        "devOutputs": 384,
        "devVoltage": 7.47,
        "isEnable": 1,
        "isOnline": 1,
        "isDataOK": 1,
        "isEvent": 1,
        "isWaiting": 0,
        "isDelivered": 0,
        "retryCounter": 0,
        "devPriority": 0
    }
}
GET http://websdk.polimex.online/sdk/status.json
Parameters can be dev OR id
dev parameter request the controller number in the internal list of the module
Examle: .../status.json?dev=15
id parameter request the controller by hardware ID (RS485 ID)
Example: .../status.json?id=18
| JSON field | Description |
|---|---|
| devInList: 0 | The number of the controller in internal list |
| devID: 1 | Th ID of the controller |
| devHardware: 9 | Hardware version of the controller |
| devSoftware: 734 | Firmware version of the controller |
| devSerial: 6 | Serial number of the controller |
| devError: 0 | 224=0xE0, 0xE0 -> Error=0 (OK), 0xE1 -> Error=1, 0xE2 -> Error=2 |
| devInputs: 0 | Input of the controller |
| devOutputs: 4 | Outputs of the controller |
| devVoltage: 13.47 | Current voltage of the controller |
| isEnable: 1 | Is enabled |
| isOnline: 1 | Internal use |
| isDataOK: 1 | Internal use |
| isEvent: 1 | (flag) (Server Push - ON) device has an event |
| isWaiting: 0 | (flag) (Server Push - ON) the device waiting to send the event to server |
| isDelivered: 0 | (flag) (Server Push - ON) the last event was successful delivered to server |
| retryCounter: 0 | flag) (Server Push - ON) |
| devPriority: 0 | scan priority |
Set Priority for events from specific controller
HTTP Request
GET http://websdk.polimex.online/sdk/status.json?dev=0&pri=0&wr=1
| Parameter “pri” value | Description |
|---|---|
| 0 | rescan after 1000 mSec (1 Sec) – default |
| 1 | rescan after 200 mSec |
| 2 | rescan after 500 mSec |
| 3 | rescan after 800 mSec |
| Parameter “wr” value | Description |
|---|---|
| 0 | temporary change – default |
| 1 | permanent change |
Set output state on module
HTTP Request
GET http://websdk.polimex.online/sdk/out.json?out=0&on=1&ts=10
| Parameter | Description |
|---|---|
| out | output number – 0..3 |
| on | new state – 0..1 |
| ts | time in seconds – 32bit unsigned |
| tms | time in miliseconds – 32bit unsigned |
Get IO status on module
HTTP Request
{
    convertor: 240835,
    portOut: {
        out0: 0,
        out0timer: 0,
        out0cnt: 0,
        out1: 0,
        out1timer: 0,
        out1cnt: 0,
        out2: 0,
        out2timer: 0,
        out2cnt: 0,
        out3: 0,
        out3timer: 0,
        out3cnt: 0
    },
    portInDigital: {
        in0: 0,
        in0cnt: 0,
        in1: 0,
        in1cnt: 0,
        in2: 0,
        in2cnt: 0,
        in3: 0,
        in3cnt: 0,
        in4: 0,
        in4cnt: 0
    },
    portInAnalog: {
        an0: 855,
        an1: 775,
        an2: 0,
        an3: 0
    }
}
GET http://websdk.polimex.online/iostatus.json
Event from IO ports on module (HTTP IO Event Server Push)
{
    "convertor": 250001,
    "key": "D407",
    "portOut":{
        out0: 1,
        out0timer: 20,
        out0cnt: 0,
        out1: 0,
        out1timer: 0,
        out1cnt: 0,
        out2: 0,
        out2timer: 0,dd
        out2cnt: 0,
        out3: 0,
        out3timer: 0,
        out3cnt: 0
    },
    "portInDigital":{
        in0: 0,
        in0cnt: 6,
        in1: 1,
        in1cnt: 15,
        in2: 0,
        in2cnt: 0,
        in3: 0,
        in3cnt: 0,
        in4: 0,
        in4cnt: 0
    }
}
When IO (Input/Output)* event occurred the convertor send POST to server
POST http://192.168.74.5 HTTP/1.1
Host: 192.168.74.5
Content-Type: application/json
Content-Length: 411
Reboot module
HTTP Request
GET http://websdk.polimex.online/sdk/cmd.json?reboot
Security tips
The WEBSDK have several different type of security features. You are free to use all of them in any combinations depend on your needs.
IP filtering
The module have IP filterinf feature. It reject connectoins from different IPs if it is enabled.
Note: You have to be behind NAT or with direct acces to the interface to setup or chnage this feature.
Password for Admin user
Default: no password
Note: You have to be behind NAT or with direct acces to the interface to setup or chnage this feature.
Password for sdk user
Default: no password
Note: You have to be behind NAT or with direct acces to the interface to setup or chnage this feature.
Serial number
All rsponses from the SDK module include serial number. You can identify the module with this serial number
Note: You have to be behind NAT or with direct acces to the interface to setup or chnage this feature.
Security Key
All responses from the SDK module include security key. This key can be changed but not see it. This can protect your server from fake events if your server is in Internet.
Note: You have to be behind NAT or with direct acces to the interface to setup or chnage this feature.
Commands to controllers
HTTP Client All commands are divided in two groups - READ(0xFx) commands and WRITE(0xDx) commands. All command are JSON Object structure.
Structure of the commands
HTTP REQUEST: POST http://192.168.74.41/sdk/cmd.json
{
    "cmd":{
        "id":4,
        "c":"Fx or Dx",
        "d":"02"
    }
}
HTTP REQUEST: ‘POST http://192.168.74.41/sdk/cmd.json’
Example
{
    "cmd":{
        "id":4,
        "c":"F2",
        "d":"02A1003480"
    }
}
HTTP RESPONSE:
{
    "convertor":0,
    "response":{
        "id":8,
        "c":"D7",
        "e":0,
        "d":""
    }
}
Request
Every command have 3 required fields:
| Field Name | Type | Description |
|---|---|---|
| cmd | JSON Object | Content of the command |
| id | JSON Number | ID of the controller behind WebSDK |
| c | JSON String | Hex representation of the command to controller |
| d | JSON String | Additional data to command |
All data in “d” field will be converted to HEX: 0x02 0xA1 0x00 0x34 0x80 (5 bytes in example)
The SDK has limitations:
- Max JSON string length is 400 bytes
- Max tokens is 52 bytes
Response
The response of the command contain same information as command but have additional information for the result of the execution. The structure of the response is JSON Object with following fields:
| Field Name | Type | Description |
|---|---|---|
| cmd | JSON Object | Content of the command |
| id | JSON Number | ID of the controller behind WebSDK |
| c | JSON String | Hex representation of the command to controller |
| e | JSON Number | Code of the error from execution. See more here |
| d | JSON String | Additional data from controller after execution of the command |
How data conversion work
Let’s take a card number for example (DEC number to controller):
Card number printed on it: 0012345678 (Decimal code 55D, or Decimal code 10D)
The controller does not understand that format. Each number has to be converted to string like this:
0->00, 0->00, 1->01, 2->02, 3->03, 4->04, 5->05, 6->06, 7->07, 8->08
Result: 00000102030405060708 (String length 20)
The controller internal will encode to: 0012345678 (DEC)
Let’s take a HEX number for example (HEX number to controller):
HEX number: 0x02A1003480 (HEX length 5)
The controller does not understand that format. Each number has to be converted to string like this:
02->02, A1->A1, 00->00, 34->34, 80->80
Result: 02A1003480 (String length 10)
The controller internal will encode to: 0x02A1003480 (HEX length 5)
0xF0 - Read system information
HTTP REQUEST:
POST http://websdk.polimex.online/sdk/cmd.json
{
    "cmd":{
        "id":8,
        "c":"F0"
    }
}
HTTP RESPONSE:
{
    "convertor":0,
    "response":{
        "id":8,
        "c":"F0",
        "e":0,
        "d":"0006000400000703020000030000030201050208000200020004080004000000"
    }
}
Description
Read system information from the controller (Device).
Details
| Description | Value | Decoded value |
|---|---|---|
| Hardware version | 0006 | 06 |
| Serial Number | 00040000 | 0400 |
| Software version | 070302 | 732 |
| Inputs | 000003 | 003 |
| Outputs | 000003 | 003 |
| Readers | 02 | 2 |
| Time Schedules | 0105 | 15 |
| I/O table lines | 0208 | 28 |
| Alarm lines | 00 | 0 |
| mController mode | 02 | 2 |
| Max cards count | 0002000408 | 02048 |
| Max events count | 0004000000 | 04000 |
- How data conversion work - see more
HW - Hardware code:
| code | Ctrl type | code | Ctrl type | code | Ctrl type | code | Ctrl type | code | Ctrl type |
|---|---|---|---|---|---|---|---|---|---|
| 1 | iCON200 | 6 | iCON110 | 11 | iCON115 | 16 | Vending | 21 | AlarmControl |
| 2 | iCON150 | 7 | iCON160 | 12 | iCON50 | 17 | iCON130 | 22 | AlarmControl |
| 3 | iCON150 | 8 | iCON170 | 13 | FireControl | 18 | FireControl | 23 | AlarmControl |
| 4 | iCON140 | 9 | Turnstile | 14 | FireControl | 19 | FireControl | 24 | iTemp |
| 5 | iCON120 | 10 | iCON180 | 15 | TempRh | 20 | AlarmControl | 25 | iGas |
| 26 | AlarmControl | 31 | RelayControl-150 | 36 | RelayControl | 41 | MFReader | 46 | MFReader |
| 27 | AlarmControl | 32 | RelayControl | 37 | RelayControl | 42 | MFReader | 47 | MFReader |
| 28 | AlarmControl | 33 | RelayControl | 38 | RelayControl | 43 | MFReader | 48 | MFReader |
| 29 | AlarmControl | 34 | RelayControl | 39 | RelayControl | 44 | MFReader | 49 | MFReader |
| 30 | RelayControl-110 | 35 | RelayControl | 40 | MFReader | 45 | MFReader | 50 | iMotor |
0xF1 - Read/Search card and info
HTTP REQUEST:
POST http://websdk.polimex.online/sdk/cmd.json
{
    "cmd":{
        "id":8,
        "c":"F1",
        "d":"00000102030405060708"
    }
}
HTTP RESPONSE:
{
    "convertor":0,
    "response":{
        "id":8,
        "c":"F1",
        "e":0,
        "d":"0000010906010203040000000001"
    }
}
HTTP RESPONSE: e:9 - Card not found
{
    "convertor":0,
    "response":{
        "id":8,
        "c":"F1",
        "e":9,
        "d":""
    }
}
Description
Search for a card number and return detailed information (if card exists) “d”:“…” - Data field: 0012345678* - search for a card number in controller memory result string : 00000102030405060708 (length = 10 x 2 = 20) see more * Controller support only 10 digit card number format
Details
| Description | Value | Decoded value |
|---|---|---|
| Position in memory | 0000010906 | 00196 |
| PIN | 01020304 | 1234 |
| TS (time schedule) | 00000000 | 0000 |
| Reader/APB (0b0000 0001) binary register | 01 | 1 |
Reader and mask byte are important for card rights! The Reader byte collect information for rights. Every bit have meaning for a reader: -> 01 (0b0000 0001) - means reader 1 -> 02 (0b0000 0010) - means reader 2 -> 03 (0b0000 0011) - means reader 1 & 2 -> 41h(0b0100 0001) - means reader 1 and flag for Anti-pass back (APB) -> 40h(0b0100 0000) - means only flag for Anti-pass back (APB) The mask byte define the meaningful bits in the reader byte. In many cases the byte is same as reader. Reader/APB :
| CODE | na | APB | APB4 | na | R4 | R3 | R2 | R1 | Description |
|---|---|---|---|---|---|---|---|---|---|
| 01 | 0 | 0 | 0 | 0 | 0 | 0 | 0 | 1 | reader 1 |
| 02 | 0 | 0 | 0 | 0 | 0 | 0 | 1 | 0 | reader 2 |
| 03 | 0 | 0 | 0 | 0 | 0 | 0 | 1 | 1 | reader 1 & 2 |
| 41 | 0 | 1 | 0 | 0 | 0 | 0 | 0 | 1 | reader 1 & APB |
| 40 | 0 | 1 | 0 | 0 | 0 | 0 | 0 | 0 | APB only |
APB4 - Work only for controller with 4 readers - about Reader 3 and Reader 4
0xF2 - Read group of cards
HTTP REQUEST:
POST http://websdk.polimex.online/sdk/cmd.json
{
    "cmd":{
        "id":8,
        "c":"F2",
        "d":"0000000000"
    }
}
HTTP RESPONSE: 00 00 00 00 09 -> 9 cards
{
    "convertor":0,
    "response":{
        "id":8,
        "c":"F2",
        "e":0,
        "d":"0000000009"
    }
}
HTTP RESPONSE: 00 00 00 01 00 -> 10 cards
{
    "convertor":0,
    "response":{
        "id":8,
        "c":"F2",
        "e":0,
        "d":"0000000100"
    }
}
HTTP RESPONSE: 00 00 00 01 01 -> 11 cards
{
    "convertor":0,
    "response":{
        "id":8,
        "c":"F2",
        "e":0,
        "d":"0000000101"
    }
}
HTTP RESPONSE: 00 00 00 08 03 -> 83 cards
{
    "convertor":0,
    "response":{
        "id":8,
        "c":"F2",
        "e":0,
        "d":"0000000803"
    }
}
HTTP RESPONSE: 00 00 03 05 08 -> 358 cards
{
    "convertor":0,
    "response":{
        "id":8,
        "c":"F2",
        "e":0,
        "d":"0000030508"
    }
}
Description
Read group of card information from the controller (Device).
Get number of cards in controller memory
“d”:“…” - Data field: 00000 - (5 digit) get number of cards in controller memory result string : 0000000000 - encoding in DEC format see more
Get number of cards starting from
HTTP REQUEST:
POST http://websdk.polimex.online/sdk/cmd.jsonfrom position 1 requestin 1 card
{
    "cmd":{
        "id":8,
        "c":"F2",
        "d":"000000000101"
    }
}
HTTP RESPONSE:
{
    "convertor":0,
    "response":{
        "id":8,
        "c":"F2",
        "e":0,
        "d":"00000102030405060708040606000000000001"
    }
}
HTTP REQUEST:
POST http://websdk.polimex.online/sdk/cmd.jsonfrom position 1 requestin 2 card
{
    "cmd":{
        "id":8,
        "c":"F2",
        "d":"000000000102"
    }
}
HTTP RESPONSE:
{
    "convertor":0,
    "response":{
        "id":1,
        "c":"F2",
        "e":0,
        "d":"0000010203040506070804060600000000000100000102030405060709040606000000000001"
    }
}
HTTP REQUEST:
POST http://websdk.polimex.online/sdk/cmd.jsonfrom position 5 requestin 1 card
{
    "cmd":{
        "id":8,
        "c":"F2",
        "d":"000000000501"
    }
}
HTTP RESPONSE:
{
    "convertor":0,
    "response":{
        "id":8,
        "c":"F2",
        "e":0,"d":"00000202030405060708040606000000000001"
    }
}
| Start position | Count | Result | Description |
|---|---|---|---|
| for max cards see cmd F0 | max 05 | ||
| 00001 | 01 | 0000000001 01 | Start from pos.1, read 1 card |
| 00001 | 02 | 0000000001 02 | Start from pos.1, read 2 cards |
| 00005 | 01 | 0000000005 01 | Start from pos.5, read 1 card |
0xF3 - Read Time Schedules
HTTP REQUEST:
POST http://websdk.polimex.online/sdk/cmd.jsonRead Time Schedules
{
    "cmd":{
        "id":3,
        "c":"F3",
        "d":"01"
    }
}
HTTP RESPONSE:
{
    "convertor":0,
    "response":{
        "id":9,
        "c":"F3",
        "e":0,
        "d":"
            01010101020201020203010302040104020501050206010602070107020801080209010902100110021101110212011202130113021401140215011502160116021701170218011802190119022001200201010102020102020301030204010402050105020601060207010702080108021001100210031004100510061007100800"
    }
}
HTTP REQUEST:
POST http://websdk.polimex.online/sdk/cmd.jsonWrite Time Schedules
{
    "cmd":{
        "id":9,
        "c":"D3",
        "d":"01010101020201020203010302040104020501050206010602070107020801080209010902100110021101110212011202130113021401140215011502160116021701170218011802190119022001200201010102020102020301030204010402050105020601060207010702080108021001100210031004100510061007100800"
    }
}
HTTP RESPONSE:
{
    "convertor":0,
    "response":{
        "id":9,
        "c":"D3",
        "e":0,
        "d":"01"
    }
}
Description
Read time schedule (TS) from controller (Device). All controllers have 8 different TS numbered from 1 to 8. The value 0 means not using TS. The TS can be used for adding cards. In the permitted TS, the cards works normal. In restricted time, the registered cards generate TS Error event.
Details
| Day | Data in command | [begin - end] … [hour:min - hour:min] | Day of the week |
|---|---|---|---|
| 01 | 01 | TS number | |
| 1 | 0101 0102 0201 0202 0301 0302 0401 0402 | [01:01 - 01:02] [02:01 - 02:02] [03:01 - 03:02] [04:01 - 04:02] | Monday |
| 2 | 0501 0502 0601 0602 0701 0702 0801 0802 | [05:01 - 05:02] [06:01 - 06:02] [07:01 - 07:02] [08:01 - 08:02] | Tuesday |
| 3 | 0901 0902 1001 1002 1101 1102 1201 1202 | [09:01 - 09:02] [10:01 - 10:02] [11:01 - 11:02] [12:01 - 12:02] | Wednesday |
| 4 | 1301 1302 1401 1402 1501 1502 1601 1602 | [13:01 - 13:02] [14:01 - 14:02] [15:01 - 15:02] [16:01 - 16:02] | Thursday |
| 5 | 1701 1702 1801 1802 1901 1902 2001 2002 | [17:01 - 17:02] [18:01 - 18:02] [19:01 - 19:02] [20:01 - 20:02] | Friday |
| 6 | 0101 0102 0201 0202 0301 0302 0401 0402 | [01:01 - 01:02] [02:01 - 02:02] [03:01 - 03:02] [04:01 - 04:02] | Saturday |
| 7 | 0501 0502 0601 0602 0701 0702 0801 0802 | [05:01 - 05:02] [06:01 - 06:02] [07:01 - 07:02] [08:01 - 08:02] | Sunday |
| 8 | 1001 1002 1003 1004 1005 1006 1007 1008 | [10:01 - 10:02] [10:03 - 10:04] [10:05 - 10:06] [10:07 - 10:08] | Holiday |
| 00 | 00 | Holiday index |
0xF4 - Read Holiday list
HTTP REQUEST:
POST http://websdk.polimex.online/sdk/cmd.json
{
    "cmd":{
        "id":3,
        "c":"F4",
        "d":"01"
    }
}
HTTP RESPONSE:
{
    "convertor":0,
    "response":{
        "id":3,
        "c":"F4",
        "e":0,
        "d":"0101010303180419042004010502050505060524050609220901110000000000000000000000000000000000000000000000000000000000000000000000000000"
    }
}
Description
Read Holiday List (HL) from controller (Device). All controllers have 8 different HL numbered from 1 to 8. The controller use HL for setup different TS for this days.
Details
The value 0 means not using HL. The HL can be used for TS setup. Every date is coded without year. Please note it. The date is coded in 2 bytes. First byte is the date, the second one is for Month (DD MM)
{"convertor":0,"response":{"id":8,"c":"F4","e":0,"d":"$01 $XX..$XX"}}
"d":"
            01
            0101
            0303
            1804
            1904
            2004
            0105
            0205
            0505
            0605
            2405
            0609
            2209
            0111
            0000....000"
TODO: Need details. Contact with us if you need it!
0xF5 - Read controller mode
HTTP REQUEST:
POST http://websdk.polimex.online/sdk/cmd.json
{
    "cmd":{
        "id":3,
        "c":"F5"
    }
}
HTTP RESPONSE:
{
    "convertor":0,
    "response":{
        "id":8,
        "c":"F5",
        "e":0,
        "d":"02"
    }
}
Description
The controllers have 2 or 4 readers. Based on readers, the possible modes are:
| Mode | Reader 1 Door/Way | Reader 2 Door/Way | Reader 3 Door/Way | Reader 4 Door/Way |
|---|---|---|---|---|
| 0x01 | Door 1 / In | Door 1 / Out | - | - |
| 0x02 | Door 1 / In | Door 2 / In | - | - |
| 0x03 | Door 1 / In | Door 1 / Out | Door 2 / In | Door 3 / In |
| 0x04 | Door 1 / In | Door 2 / In | Door 3 / In | Door 4 / In |
| 0x21 | external db | external db | external db | external db |
Only doors with In and Out reader can manage APB (Anti pass back) function
The externel DB mode is used for large scale systems with unlimited card users. The verification of the card is online. The problem will become if the internet connection lost. The system will stop!
0xF6 - Read readers mode
HTTP REQUEST:
POST http://websdk.polimex.online/sdk/cmd.json
{
    "cmd":{
        "id":8,
        "c":"F6"
    }
}
HTTP RESPONSE: 2 readers
{
    "convertor":0,
    "response":{
        "id":8,
        "c":"F6",
        "e":0,
        "d":"010402010100000000000000"
    }
}
HTTP RESPONSE: 4 readers
    {"convertor":0,
    "response":{
        "id":8,
        "c":"F6",
        "e":0,
        "d":"010402010100010100010100"
    }
}
HTTP RESPONSE: 4 readers
{
    "convertor":0,
    "response":{
        "id":8,
        "c":"F6",
        "e":0,
        "d":"01040201010A01010001010F"
    }
}
Description
All controllers have Wiegand 26/34 bit autodetect ports. For this ports, you can specify the different modes. You also can change automaticly the mode base on Time Schedule(TS) codes in the controller. The required data for reader mode include:
- Reader mode in normal time
- Reader mode in Time scheduled time
- Time schedule code (encoded in hex 0x00-0x0f)
Avaliable mreader modes are as follow:
| Mode | Name | Description |
|---|---|---|
| 1 | Card only | Only card is readed |
| 2 | Card AND PIN | Card required PIN |
| 3 | Card AND WORK CODE | Card and optional PIN |
| 4 | Card OR PIN | Only card OR only PIN |
Example case of this function is: Using card for entrance in working space in work days/hours. Requiring PIN for other time in the week
Examples (per reader):
| Encoding for command | Description |
|---|---|
| 01 01 00 | Mode 1 for regular time and TS time and 0 for TS code |
| 01 02 01 | Mode 1 for regular time and Mode 2 for TS time in 1 TS code |
Please note: if using TS code 0, the Reader mode for TS time not used but have to be corect!
Example for final command to controller with information for 4 readers: 010402 010100 010100 010100
0xF7 - Read System Clock
HTTP REQUEST:
POST http://websdk.polimex.online/sdk/cmd.json
{
    "cmd":{
        "id":3,
        "c":"F7"
    }
}
HTTP RESPONSE:
{
    "convertor":0,
    "response":{
        "id":3,
        "c":"F7",
        "e":0,
        "d":"00152204241013"
    }
}
Description
All control panels have battery backed real time clock. You can read/write information from this clock.
| Field | Value | Encoded value |
|---|---|---|
| Time | 22:15:00 | 001522 |
| Day of the week | 4 | 04 |
| Date | 24 oct 2013 | 241013 |
0xF8 - Read duress mode
HTTP REQUEST:
POST http://websdk.polimex.online/sdk/cmd.json
{
    "cmd":{
        "id":8,
        "c":"F8"
    }
}
HTTP RESPONSE: Controller with 2 or 4 readers - duress OFF
{
    "convertor":0,
    "response":{
        "id":8,
        "c":"F8",
        "e":0,
        "d":"0011220000"
    }
}
HTTP RESPONSE: 2 readers
    {"convertor":0,
    "response":{
        "id":8,
        "c":"F8",
        "e":0,
        "d":"0311220000"
    }
}
HTTP RESPONSE: One of 2 readers
{
    "convertor":0,
    "response":{
        "id":8,
        "c":"F8",
        "e":0,
        "d":"0211220000"
    }
}
HTTP RESPONSE: One of 2 readers
{
    "convertor":0,
    "response":{
        "id":8,
        "c":"F8",
        "e":0,"d":"0111220000"
    }
}
HTTP RESPONSE: Controller with 4 readers
    {"convertor":0,
    "response":{
        "id":8,
        "c":"F8",
        "e":0,
        "d":"0F11223344"
    }
}
Description
Control panels have special function for duress mode. This mode is designed to alert and notify the administrator about the duress situation by entering the pre-configured two digit password in case the user is threatened to open the door. This function can be activated and deactivated. You have to setup two digit password to activate this alarm. Default duress mode is deactivated and two digit password is 55.
The structure of the data in this command is:
byte with flags for reader - represent enable/disabe for reader. Every bit from 0 to 4 can be high or low
4 bytes for two digit password encoded like: password 11 -> 11, 55->55. This bytes represend password for every reader from 1 to 4
Example for flags byte:
| Value | Binary | Description |
|---|---|---|
| 00 | 0b0000 0000 | The function not working at all |
| 01 | 0b0000 0001 | The function enabled only for reader 1 |
| 02 | 0b0000 0010 | The function enabled only for reader 2 |
| 03 | 0b0000 0011 | The function enabled only for readers 1 and 2 |
| 04 | 0b0000 0100 | The function enabled only for reader 3 |
| 08 | 0b0000 1000 | The function enabled only for reader 4 |
| 0F | 0b0000 1111 | The function enabled for readers 1, 2, 3 and 4 |
Example for 4 bytes two digit passwords:
| Value | Description |
|---|---|
| 11 22 33 44 | Reader 1 password 11, Reader 2 password 22, Reader 3 password 33, Reader 4 password 44 |
Final example for data:
"d":"0f11223344"
Defailt value for controllers:
"d":"0055555555"
0xF9 - Read Input/Output table
HTTP REQUEST:
POST http://websdk.polimex.online/sdk/cmd.json
Read I/O table row 1 - d:[01..1C]hex / 1..28dec
{
    "cmd":{
        "id":8,
        "c":"F9",
        "d":"01"
    }
}
HTTP REQUEST:
POST http://websdk.polimex.online/sdk/cmd.json
Read I/O table row 2
{
    "cmd":{
        "id":8,
        "c":"F9",
        "d":"02"
    }
}
HTTP REQUEST:
POST http://websdk.polimex.online/sdk/cmd.json
Read I/O table row 11
{
    "cmd":{
        "id":8,
        "c":"F9",
        "d":"0B"
    }
}
HTTP REQUEST:
POST http://websdk.polimex.online/sdk/cmd.json
Read I/O table row 28 max
{
    "cmd":{
        "id":8,
        "c":"F9",
        "d":"1C"
    }
}
HTTP RESPONSE:
{
    "convertor":0,
    "response":{
        "id":8,
        "c":"F9",
        "e":0,
        "d":"0000000000050000"
    }
}
HTTP REQUEST:
POST http://websdk.polimex.online/sdk/cmd.json
See cmd: D9 - write I/O tables - it’s not a real data, only for example
{
    "cmd":{
        "id":5,
        "c":"D9",
        "d":"020000000000050123"
    }
}
HTTP RESPONSE:
{
    "convertor":0,
    "response":{
        "id":5,
        "c":"D9",
        "e":0,
        "d":""
    }
}
Description
The controllers works like PLC. The functionality can be controller from a table with Inputs(In) and Outputs(Out). Inputs are hardware and software. For every input there is state for every Hardware output. The values are from 0(not used) to 97 in seconds. 98 is trigger mode and every time trigger the output in opposit state. 99 is forever open and can be used for emergency. Understanding this commands giving you complete view of the controller functionality.
For some special controllers exists small exception from the rule above.
All controllers have fixed 28 lines(28 imputs) table. The outputs are also fixed to 8. Not all controllers use all 28 lines.
The example of IO table is presented like a standard table as below for iCON110:
| In | Input/Event Number | Input/Event Name | Out 8 | Out 7 | Out 6 | Out 5 | Out 4 | Out 3 | Out 2 | Out 1 |
|---|---|---|---|---|---|---|---|---|---|---|
| 1 | 1 | Duress | 00 | 00 | 00 | 00 | 00 | 00 | 03 | 03 |
| 2 | 2 | Duress Error | 00 | 00 | 00 | 00 | 00 | 05 | 00 | 00 |
| 3 | 3 | Reader1, Card OK | 00 | 00 | 00 | 00 | 00 | 00 | 00 | 03 |
| 4 | 4 | Reader1, Card Error | 00 | 00 | 00 | 00 | 00 | 03 | 00 | 00 |
| 5 | 5 | Reader1, TS Error | 00 | 00 | 00 | 00 | 00 | 03 | 00 | 00 |
| 6 | 6 | Reader1, APB Error | 00 | 00 | 00 | 00 | 00 | 03 | 00 | 00 |
| 7 | 7 | Reader2, Card OK | 00 | 00 | 00 | 00 | 00 | 00 | 03 | 00 |
| 8 | 8 | Reader2, Card Error | 00 | 00 | 00 | 00 | 00 | 03 | 00 | 00 |
| 9 | 9 | Reader2, TS Error | 00 | 00 | 00 | 00 | 00 | 03 | 00 | 00 |
| A | 10 | Reader2, APB Error | 00 | 00 | 00 | 00 | 00 | 03 | 00 | 00 |
| B | 11 | Reader3, Card OK | 00 | 00 | 00 | 00 | 00 | 00 | 00 | 00 |
| C | 12 | Reader3, Card Error | 00 | 00 | 00 | 00 | 00 | 00 | 00 | 00 |
| D | 13 | Reader3, TS Error | 00 | 00 | 00 | 00 | 00 | 00 | 00 | 00 |
| E | 14 | Reader3, APB Error | 00 | 00 | 00 | 00 | 00 | 00 | 00 | 00 |
| F | 15 | Reader4, Card OK | 00 | 00 | 00 | 00 | 00 | 00 | 00 | 00 |
| 10 | 16 | Reader4, Card Error | 00 | 00 | 00 | 00 | 00 | 00 | 00 | 00 |
| 11 | 17 | Reader4, TS Error | 00 | 00 | 00 | 00 | 00 | 00 | 00 | 00 |
| 12 | 18 | Reader4, APB Error | 00 | 00 | 00 | 00 | 00 | 00 | 00 | 00 |
| 13 | 19 | Emergency Input | 00 | 00 | 00 | 00 | 00 | 63 | 63 | 63 |
| 14 | 20 | Arm On Siren | 00 | 00 | 00 | 00 | 00 | 00 | 00 | 00 |
| 15 | 21 | Exit Button 1 | 00 | 00 | 00 | 00 | 00 | 00 | 00 | 03 |
| 16 | 22 | Exit Button 2 | 00 | 00 | 00 | 00 | 00 | 00 | 03 | 00 |
| 17 | 23 | Exit Button 3 | 00 | 00 | 00 | 00 | 00 | 00 | 00 | 00 |
| 18 | 24 | Exit Button 4 | 00 | 00 | 00 | 00 | 00 | 00 | 00 | 00 |
| 19 | 25 | Door Overtime | 00 | 00 | 00 | 00 | 00 | 00 | 00 | 00 |
| 1A | 26 | Door Forced Open | 00 | 00 | 00 | 00 | 00 | 00 | 00 | 00 |
| 1B | 27 | On Delay | 00 | 00 | 00 | 00 | 00 | 00 | 00 | 00 |
| 1C | 28 | Off Delay | 00 | 00 | 00 | 00 | 00 | 00 | 00 | 00 |
0xFA - Manual reading events from controller
HTTP REQUEST:
POST http://websdk.polimex.online/sdk/cmd.json
{
    "cmd":{
        "id":5,
        "c":"FA"
    }
}
HTTP RESPONSE:
Power ON Event
{
    "id":5,
    "c":"FA",
    "e":0,
    "d":"000000000400000000011E5303220427071700000000000000000000000000"
}
Description
The command reads the oldest event stored in the controller. After receiving the event, controller do not erase it from his memory. You need to send command 0xDA Delete last event. If not send delete event, you will receive always the oldest one event.
“d” field contain following data:
| Field name | Data | Encoded Data | Description |
|---|---|---|---|
| TOS | 0000000004 | 00004 | Total count of stored events in the controller |
| BOS | 0000000001 | 00001 | Number of the current event in controller history |
| Event | 1E | 1E | Type of the event |
| Seconds | 53 | 53 | Seconds from the time stamp of the event |
| Minutes | 03 | 03 | Minutes from the time stamp of the event |
| Hours | 22 | 22 | Hours from the time stamp of the event |
| Day of the week | 04 | 04 | Day of the week from the time stamp of the event |
| Day | 27 | 27 | Day from the time stamp of the event |
| Month | 07 | 07 | Month from the time stamp of the event |
| Year | 16 | 16 | Year from the time stamp of the event |
| Card | 00000000000000000000 | 0000000000 | Card number of the event |
| Reader | 00 | 0 | Reader number. Use this byte with mask of first 3 bits from the mask (Reader & 7) |
| PIN | 0000 | 0000 | Pin code used with this card. Useful for “Card and Work Code” mode |
0xFB - Read Inputs flags
TODO: Need details. Contact with us if you need it!
0xFC - Read Anti pass back mode
TODO: Need details. Contact with us if you need it!
0xFD - Read Fire & Security status
TODO: Need details. Contact with us if you need it!
0xFE - Read FireTime, Sound_Time
TODO: Need details. Contact with us if you need it!
0xFF - Read Outputs T/S table
TODO: Need details. Contact with us if you need it!
0xD0 - Write controller ID
HTTP REQUEST:
POST http://websdk.polimex.online/sdk/cmd.json
{
    "cmd":{
        "id":15,
        "c":"D0",
        "d":"0101"
    }
}
HTTP RESPONSE:
{
    "convertor":0,
    "response":{
        "id":15,
        "c":"D0",
        "e":0,
        "d":"0101"
    }
}
NEXT STEP:
if (“e” == 0) && (“d” == new id) { if (firmware version of “id” >= 701) { send {“cmd”:{“id”:11,“c”:“D0”,“d”:“0101”}} } new ID is successful applied }Example - changing ID:
from= 28 (dec) -> result UINT8 - 1C (hex)
to= 14 (dec) -> result string - “d”:“0E” (hex)HTTP REQUEST:
POST http://websdk.polimex.online/sdk/cmd.json
{
    "cmd":{
        "id":28,
        "c":"D0",
        "d":"0E"
    }
}
HTTP RESPONSE:
{
    "convertor":0,
    "response":{
        "id":28,
        "c":"D0",
        "e":0,
        "d":"0E"
    }
}
NEXT STEP: if (“e” == 0) && (“d” == new id) { if (firmware version of “id” >= 701) { send {“cmd”:{“id”:14,“c”:“D0”,“d”:“0E”}} } new ID is successful applied }
Example of changing ID: from= 15 -> result UINT8 - 15 to= 11 -> result string - “d”:“0101”
Description
Changing the ID of the controller.
In regular use you do not need to do this operation!
0xD1 - Add/Delete Card
HTTP Request :
POST http://websdk.polimex.online/sdk/cmd.json
Add card to reader 1
{
    "cmd":{
        "id":1,
        "c":"D1",
        "d":"0000010203020009060901020304000000000101"
    }
}
HTTP Request :
POST http://websdk.polimex.online/sdk/cmd.json
Delete card from reader 1
{
    "cmd":{
        "id":1,
        "c":"D1",
        "d":"0000010203020009060901020304000000000001"
    }
}
HTTP Request :
POST http://websdk.polimex.online/sdk/cmd.json
Add card to reader 2
{
    "cmd":{
        "id":1,
        "c":"D1",
        "d":"0000010203020009060901020304000000000202"
    }
}
HTTP Request :
POST http://websdk.polimex.online/sdk/cmd.json
Delete card from reader 2
{
    "cmd":{
        "id":1,
        "c":"D1",
        "d":"0000010203020009060901020304000000000002"
    }
}
HTTP Request :
POST http://websdk.polimex.online/sdk/cmd.json
Add card to reader 1 and 2 and reset APB flag
{
    "cmd":{
        "id":1,
        "c":"D1",
        "d":"0000010203020009060901020304000000000343"
    }
}
HTTP Request :
POST http://websdk.polimex.online/sdk/cmd.json
Delete card from reader 1 and 2
{
    "cmd":{
        "id":1,
        "c":"D1",
        "d":"0000010203020009060901020304000000000003"
    }
}
HTTP RESPONSE:
How many cards are stored in ctrl. memory
{
    "cmd":{
        "id":1,
        "c":"D1",
        "e":0,
        "d":"0000010906"
    }
}
Description
This is most important command in the SDK. Please read it carfuly. This command is for add/delete card in the controller. The structure of the command is as below:
| Description | Value | Encoded value | More information |
|---|---|---|---|
| Card number | 0012320969 | 00000102030200090609 | |
| PIN code | 1234 | 01020304 | |
| TS code for 1..4 readers | B700 | 0B070000 | Time Schedule (hex) for reader 1,2,3,4 |
| Rights for Reader/APB | 1 | 01 | (0b0000 0001) binary register |
| Mask for Rights | 1 | 01 | (0b0000 0001) binary register |
result string : 00000102030200090609 01020304 0B070000 01 01
The structure of the Rights for Reader/APB and Mask for Rights are same:
| Bit | Description | Example | Active | Unactive |
|---|---|---|---|---|
| 0 | Reader 1 | 0b 0000 0001 | 0x01 | 0x00 |
| 1 | Reader 2 | 0b 0000 0010 | 0x02 | 0x00 |
| 2 | Reader 3 | 0b 0000 0100 | 0x04 | 0x00 |
| 3 | Reader 4 | 0b 0000 1000 | 0x08 | 0x00 |
| 4 | Not used | Not used | Not used | Not used |
| 5 | Anti Pass Back 2 (for Door 2) | 0b 0001 0000 | 0x10 | 0x00 |
| 6 | Anti Pass Back (for Door 1) | 0b 0010 0000 | 0x40 | 0x00 |
| 7 | Not used | Not used | Not used | Not used |
Reader and mask byte are important for card rights! The Reader byte collect information for rights.
The mask byte define the meaningful bits in the reader byte. In many cases the byte is same as reader. Example of difference is:
reader 00h, mask 40h - means change the APB flag for the card only
APB2 - Work only for controller with 4 readers - about Reader 3 and Reader 4
See command 0xDE - Write Anti-pass back (APB) mode
Examples
Example 1 - add card to R2 only
| CODE | APB | APB2 | R4 | R3 | R2 | R1 | Description | ||
|---|---|---|---|---|---|---|---|---|---|
| reader=02 | 0 | 0 | 0 | 0 | 0 | 0 | 1 | 0 | check R2 flag only |
| mask=02 | 0 | 0 | 0 | 0 | 0 | 0 | 1 | 0 | set card to R2 |
Example 2 - add same card to R1 too
| CODE | APB | APB2 | R4 | R3 | R2 | R1 | Description | ||
|---|---|---|---|---|---|---|---|---|---|
| reader=01 | 0 | 0 | 0 | 0 | 0 | 0 | 0 | 1 | check R1 flag only |
| mask=01 | 0 | 0 | 0 | 0 | 0 | 0 | 0 | 1 | set card to R1 |
Example 3 - delete same card of R1 only
| CODE | APB | R4 | R3 | R2 | R1 | Description | |||
|---|---|---|---|---|---|---|---|---|---|
| reader=00 | 0 | 0 | 0 | 0 | 0 | 0 | 0 | 0 | do delete from R1 |
| mask=01 | 0 | 0 | 0 | 0 | 0 | 0 | 0 | 1 | set card to R1 |
You can call this command many times for same card. The controller update previous state of the card. Mask byte is used to determine what is for update
0xD2 - Delete Card
Description
See command - Add card 0xD1
0xD1 can DELETE card
0xD3 - Write Time Schedules
Description
The command and structure is same as Read Time Schedules 0xF3. All command details are same except the command byte F3 -> D3
0xD4 - Write Holiday list
HTTP REQUEST:
POST http://websdk.polimex.online/sdk/cmd.json
{
    "cmd":{
        "id":8,
        "c":"D4",
        "d":"0101010303180419042004010502050505060524050609220901110000000000000000000000000000000000000000000000000000000000000000000000000000"
    }
}
HTTP RESPONSE:
{
    "convertor":0,"response":{
        "id":9,
        "c":"D4",
        "e":0,
        "d":"01"
    }
}
Description
Write Holiday List (HL) to controller (Device). All controllers have 8 different HL numbered from 1 to 8. The HL can be used for TS setup.
Stucture is same as command for reading.
One byte for HL number
64 bytes for 32 holiday dates.
*Every date is coded without year. Please note it. * The date is coded in 2 bytes. First byte is the date, the second one is for Month (DD MM)
0xD5 - Write controller mode
HTTP REQUEST:
POST http://websdk.polimex.online/sdk/cmd.json
{
    "cmd":{
        "id":8,
        "c":"D5",
        "d":"21"
    }
}
HTTP RESPONSE:
{
    "convertor":0,"response":{
        "id":8,
        "c":"D5",
        "e":0
    }
}
Description
Check description in Read controller mode
Only when the controller is Turnstale controller the possible value is 01.
0xD6 - Write readers mode
HTTP REQUEST:
POST http://websdk.polimex.online/sdk/cmd.json
2 readers
{
    "cmd":{
        "id":8,
        "c":"D6",
        "d":"010402010100000000000000"
    }
}
HTTP REQUEST:
POST http://websdk.polimex.online/sdk/cmd.json
4 readers
{
    "cmd":{
        "id":8,
        "c":"D6",
        "d":"010402010100010100010100"
    }
}
HTTP REQUEST:
POST http://websdk.polimex.online/sdk/cmd.json
4 readers
{
    "cmd":{
        "id":8,
        "c":"D6",
        "d":"01040201010A01010001010F"
    }
}
HTTP RESPONSE:
{
    "convertor":0,"response":{
        "id":8,
        "c":"D6",
        "e":0,
        "d":""
    }
}
Description
All controllers have Wiegand 26/34 bit autodetect ports. For this ports, you can specify the following modes: 1 - RFID card only 2 - RFID card AND PIN 3 - RFID card AND WORK CODE 4 - RFID card OR PIN Data structure and description in command for reading readers mode
0xD7 - Write controller System clock
HTTP REQUEST:
POST http://websdk.polimex.online/sdk/cmd.json
{
    "cmd":{
        "id":1,
        "c":"D7",
        "d":"00152204241013"
    }
}
HTTP RESPONSE:
{
    "convertor":0,"response":{
        "id":1,
        "c":"D7",
        "e":0,
        "d":""
    }
}
Description:
Time: 22:15:00 -> 00 15 22
Day: day 4 of week -> 04
Date: 24 oct 2013 -> 24 10 13 result string : 00 15 22 04 24 10 13
For more details please check command for reading system clock
0xD8 - Write duress mode
HTTP REQUEST:
POST http://websdk.polimex.online/sdk/cmd.json
Controler with 2 or 4 readers - duress OFF
{
    "cmd":{
        "id":8,
        "c":"D8",
        "d":"0011223344"
    }
}
HTTP REQUEST:
POST http://websdk.polimex.online/sdk/cmd.json
Controler with 2 readers
{
    "cmd":{
        "id":8,
        "c":"D8",
        "d":"0311220000"
    }
}
HTTP REQUEST:
POST http://websdk.polimex.online/sdk/cmd.json
One of 2 readers
{
    "cmd":{
        "id":8,
        "c":"D8",
        "d":"0200220000"
    }
}
HTTP REQUEST:
POST http://websdk.polimex.online/sdk/cmd.json
One of 2 readers
{
    "cmd":{
        "id":8,
        "c":"D8",
        "d":"0111000000"
    }
}
HTTP REQUEST:
POST http://websdk.polimex.online/sdk/cmd.json
Controller with 4 readers
{
    "cmd":{
        "id":8,
        "c":"D8",
        "d":"0F11223344"
    }
}
HTTP RESPONSE:
{
    "convertor":0,"response":{
        "id":8,
        "c":"D8",
        "e":0,
        "d":""
    }
}
Description
Please check all details in command for reading duress mode
0xD9 - Write Input/Output table
HTTP REQUEST:
POST http://websdk.polimex.online/sdk/cmd.json
write I/O table row 1 - d:[01..1C]hex
{
    "cmd":{"id":8,
        "c":"D9",
        "d":"010000000000050123"
    }
}
HTTP REQUEST:
POST http://websdk.polimex.online/sdk/cmd.json
write I/O table row 28 - 0x1C max
{
    "cmd":{
        "id":8,
        "c":"D9",
        "d":"1C0000000000050123"
    }
}
HTTP RESPONSE:
write is OK
{
    "convertor":0,"response":{
        "id":8,
        "c":"D9",
        "e":0,
        "d":""
    }
}
Description
Please check command 0xF9 for read I/O tables
User can change arbitrary table of all. Changes take effect immediately.
0xDA - Delete Last Event
Description
This command is only for manual reading events with command for reading events The controllers hold all events and cards in internal memory. To be garantee the delivery of the events to softwares, the softwares have to send this command as a proof of successly received last event. If you not send this command, you will receive only one event (the last one).
0xDB - Open Output from PC
HTTP REQUEST:
POST http://websdk.polimex.online/sdk/cmd.json
Output 2, open
{
    "cmd":{
        "id":4,
        "c":"DB",
        "d":"020100"
    }
}
HTTP REQUEST:
POST http://websdk.polimex.online/sdk/cmd.json
Output 2, close
{
    "cmd":{
        "id":4,
        "c":"DB",
        "d":"020000"
    }
}
HTTP REQUEST:
POST http://websdk.polimex.online/sdk/cmd.json
Output 2, open for 1 sec
{
    "cmd":{
        "id":4,
        "c":"DB",
        "d":"020101"
    }
}
HTTP REQUEST:
POST http://websdk.polimex.online/sdk/cmd.json
Output 10, open for 5 sec
{
    "cmd":{
        "id":4,
        "c":"DB",
        "d":"0A0105"
    }
}
HTTP REQUEST:
POST http://websdk.polimex.online/sdk/cmd.json
Output 10, close
{
    "cmd":{
        "id":4,
        "c":"DB",
        "d":"0A0005"
    }
}
HTTP REQUEST:
POST http://websdk.polimex.online/sdk/cmd.json
Mode external db, Reader 1 - card OK
{
    "cmd":{
        "id":4,
        "c":"DB",
        "d":"4003"
    }
}
HTTP REQUEST:
POST http://websdk.polimex.online/sdk/cmd.json
Mode external db, reader 1 - card ERR
{
    "cmd":{
        "id":4,
        "c":"DB",
        "d":"4004"
    }
}
HTTP REQUEST:
POST http://websdk.polimex.online/sdk/cmd.json
Mode external db, reader 2 - card OK
{
    "cmd":{
        "id":4,
        "c":"DB",
        "d":"4007"
    }
}
HTTP REQUEST:
POST http://websdk.polimex.online/sdk/cmd.json
Mode: external db, reader 2 - card ERR
{
    "cmd":{
        "id":4,
        "c":"DB",
        "d":"4008"
    }
}
HTTP RESPONSE:
After cmd with “d”:“0A0105”
{
    "convertor":0,"response":{
        "id":4,
        "c":"DB",
        "e":0,
        "d":"0A01"
    }
}
Description
This command allow you to control the controllers outputs (Device). The command generate automatic Event for Open from PC - see more.
| Out | On/Off | Timer (sec.) in HEX | description |
|---|---|---|---|
| Output number see cmd F0 | 01 - open 00 - close | 00 - timer is off 01..99 - range | |
| 0A | 01 | 00 | output 10, open |
| 0A | 01 | 05 | output 10, open for 5 sec and close |
| 0A | 00 | 05 or 00 | output 10, close |
The command will generate only one event - on the first change of the state of the output. After 5 sec the output will switched again but without event.
If you need to read the status of the inputs and Outputs please check command for reading events
0xDC - System initialization for controller
HTTP REQUEST:
POST http://websdk.polimex.online/sdk/cmd.json
Reset I/O Tables (Restore default value) - long time: 4 sec !
{
    "cmd":{
        "id":8,
        "c":"DC",
        "d":"0101"
    }
}
HTTP REQUEST:
POST http://websdk.polimex.online/sdk/cmd.json
Delete ALL Cards
{
    "cmd":{
        "id":8,
        "c":"DC",
        "d":"0303"
    }
}
HTTP REQUEST:
POST http://websdk.polimex.online/sdk/cmd.json
Delete ALL Events
{
    "cmd":{
        "id":8,
        "c":"DC",
        "d":"0404"
    }
}
HTTP RESPONSE:
json
{
    "convertor":0,"response":{
        "id":8,
        "c":"DC",
        "e":0,
        "d":""
    }
}
Description
System initialization of the controller. This operation is divided in 3 different subtypes coded in two bytes. Please check the example on the right
0xDD - Write Input flags
TODO: Need details. Contact with us if you need it!
0xDE - Write Antipass back mode
HTTP REQUEST:
POST http://websdk.polimex.online/sdk/cmd.json
OFF
{
    "cmd":{
        "id":1,
        "c":"DE",
        "d":"00"
    }
}
HTTP REQUEST:
POST http://websdk.polimex.online/sdk/cmd.json
ON
{
    "cmd":{
        "id":1,
        "c":"DE",
        "d":"01"
    }
}
HTTP RESPONSE:
{
    "convertor":0,"response":{
        "id":1,
        "c":"DE",
        "e":0,
        "d":""
    }
}
0xDF - Write Outputs T/S table
TODO: Need details. Contact with us if you need it!
Events from Controllers
HTTP Server The concept of the SDK is based on two different ways to receive events from controllers.
Automatic receiving - When you have web server, the SDK send you real time event to your URL. You do not need to ask for events. In every event, you can respond with command to any controllers in SDK.
Manual reading events - If you haven’t web server, you can read events by calling 0xFA Read events
Automatic receiving events
HTTP REQUEST from SDK to your server
POST http://192.168.74.5 HTTP/1.1
Host: 192.168.74.5
Content-Type: application/json
Content-Length: 165
{
    "convertor": 250001,
    "key": "D407",
    "event":{
        "id": 4,
        "cmd": "FA",
        "err": 0,
        "tos": 1,
        "bos": 1,
        "event_n": 16,
        "time": "00:43:44",
        "day": 2,
        "date": "23.07.13",
        "card": "0000000000",
        "reader": 1,
        "dt": "0000"
    }
}
Event exists
When event occurred the SDK send POST to your predefined server. The POST is JSON Object with following fields:
| Field Name | Type | Description |
|---|---|---|
| convertor | JSON Number | The serial number of the SDK. Useful to determine the source of the event |
| key | JSON String | Security key. See more here |
| event | JSON Object | Complete information for the event |
| event.id | JSON Number | ID of the controller generating event |
| event.cmd | JSON String | Command code - Always is Read events (0xFA) |
| event.err | JSON Number | Code of the error from execution. See more here |
| event.tos | JSON Number | Count of total events in the controller |
| event.bos | JSON Number | Count of the current event in the controller |
| event.event_n | JSON Number | Event type |
| event.time | JSON String | Time when event occur |
| event.day | JSON Number | Day of week when event occur |
| event.date | JSON String | Date when event occur |
| event.card | JSON String | Card number for this event always 10 digits. 0 if no card available |
| event.status | JSON String | info about TS for card - this is deleted on ver 733 and up |
| event.reader | JSON Number | The reader who generate this event. Possible 0. Use only first 3 bits from this byte. Reader = event.reader and 0x0F |
| event.dt | JSON String | Additional data for the event |
event.card - This field can be filled with 0. THis happened when the event is not from card. Please check the type of the event before process the field.
event.reader - to get the reader information, make logical AND of the byte with 0x0F. Please note: The information for the reader is also available in the event type.
| Reader in DEC | In HEX | In BIN | Description | Description 2 |
|---|---|---|---|---|
| 18 | 0x12 | 0b00010010 | 0001 - On/Off flag 0010 - output number |
1 (dec) - The output is just turn to On 2 (dec) - The number of output |
| 19 | 0x13 | 0b00010011 | 0001 - On/Off flag 0011 - output number |
1 (dec) - The output is just turn to On 3 (dec) - The number of output |
| 3 | 0x03 | 0b00000011 | 0000 - On/Off flag 0011 - output number |
0 (dec) - The output is just turn to Off 3 (dec) - The number of output |
- event.dt - Additional data for the event. Here are encoded used PIN/WORK code
In the response of the Event you can send JSON Object with command for execution. After execution, you will receive a response for result of the execution. The response depend of the type of the command.
No event exists
HTTP REQUEST from SDK to your server
>POST http://192.168.74.5 HTTP/1.1
Host: 192.168.74.5
Content-Type: application/json
Content-Length: 34
{
    "convertor": 250001,
    "key": "D407",
    "heartbeat": 1
}
The WebSDK is designed to work behind NAT. In this case you can not contact with equipment directly. In this case you need contact from equipment to send commands. For this reason exists Heart beat function. When HeartBeat function is enabled, the SDK send POST to your server.
| Field Name | Type | Description |
|---|---|---|
| convertor | JSON Number | The serial number of the SDK. Useful to determine the source of the event |
| key | JSON String | Security key. See more here |
| heartbeat | JSON Number | Sequence number of every packet. |
- heartbeat - When reach
65563, the count restart from1. Only when POWER UP or RESTART value is0
In the response of the Heartbeat you can send JSON Object with command for execution. After execution, you will receive a response for result of the execution. The response depend of the type of the command.
Manual reading events
Response with event information
When event occur on one of the controllers behind SDK, the SDK engine send immediately HTTP POST to your server URL. To ensure that you successful receiving the event, you must respond with HTTP Response 200 OK. In any other cases you will receive same event after 10 seconds. This policy guarantee successful receiving from your side.
Response with no event
Description
Events code list
The list of all Events codes from equipment:
| Event code (DEC) | Event Name Description(FW*>=713) |
|---|---|
| 1 | DuressOK (Out4,Out3,Out2,Out1) – Duress mode detected successfuly |
| 2 | DuressError (Out8,Out7,Out6,Out5) – Duress error |
| 3 | R1 Card OK |
| 4 | R1 Card Error |
| 5 | R1 T/S Error |
| 6 | R1 APB Error |
| 7 | R2 Card OK |
| 8 | R2 Card Error |
| 9 | R2 T/S Error |
| 10 | R2 APB Error |
| 11 | R3 Card OK |
| 12 | R3 Card Error |
| 13 | R3 T/S Error |
| 14 | R3 APB Error |
| 15 | R4 Card OK |
| 16 | R4 Card Error |
| 17 | R4 T/S Error |
| 18 | R4 APB Error |
| 19 | EmergencyOpenDoor |
| 20 | ON/OFF Siren |
| 21 | OpenDoor1 from In1 |
| 22 | OpenDoor2 from In2 |
| 23 | OpenDoor3 from In3 |
| 24 | OpenDoor4 from In4 |
| 25 | Dx Overtime |
| 26 | ForcedOpenDx |
| 27 | DELAY ZONE ON (if out) Z4,Z3,Z2,Z1 |
| 28 | DELAY ZONE OFF (if in) Z4,Z3,Z2,Z1 |
| 29 | |
| 30 | Power On event |
| 31 | Open/Close Door From PC |
| 45 | 1-W ERROR (wiring problems) |
*FW= Firmware Version
Error codes from controllers
| Code (DEC) | Description |
|---|---|
| 0 | No Error |
| 1 | I2C Error |
| 2 | I2C Error |
| 3 | RS485 Error |
| 4 | Wrong Value/Parameter |
| 5 | CRC Error |
| 6 | Memory error |
| 7 | Cards Overflow |
| 8 | Not use |
| 9 | Card not found |
| 10 | No Cards |
| 11 | Not use |
| 12 | Controler busy, Local menu active or Master card mode in use. |
| 13 | 1-Wire Error |
| 14 | Unknown command |
| 20 | No Response from controller (WebSDK) |
| 21 | Bad JSON structure/command data (WebSDK) |
| 22 | Bad CRC from controller (WebSDK) |
First Steps
Initial setup
First steps to start working with SDK module
- Go to the web interface of the module
- Select from the menu “Device setup”
- User: admin Password:
- In the “Web SDK parameters setup” check
4.1. “SDK receive commands”
4.2. “SDK sends events” - Go to “SDK Device Manager” from the top menu
- Scan for controller connected to this module with “START” button
Server Setup
To star using SDK with your own server, you have to tell to module the address of your server. To do this go to the web interface and setup the following:
Example: Web SDK parameters setup: receive.polimex.online/v11
- Do the Initial setup
- Select from the menu “Device setup”
- In the “Web SDK parameters setup” check
3.1. “HTTP Server Push URL”
3.2. “HeartBeat Time” - “Save settings”
{
    "convertor":240114,
    "heartbeat":4
}
After setting your server you will start receiveing JSON stuctures like example. The heartbeat have internal count and it increase to 65535. After reaching the max value it restart from 0.
Receiving events
{
    "convertor":240114,
    "event":{
        "id":9,
        "cmd":"FA",
        "err":0,
        "tos":2,
        "bos":1,
        "event_n":30,
        "time":"00:39:43",
        "day":3,
        "date":"18.11.15",
        "card":"0000000000",
        "status":0,
        "reader":0,
        "dt":"0000"
    }
}
After setup the URL of your server, you will start receiving the events form all detected (in Device Manager) controllers as example
In your response, you can send command for execution. After execution, you will receive result to your server. TODO: Example!